Transferring cryptocurrency is one of the basic operations every user faces. Withdrawing USDT from an exchange to your wallet, sending ETH to a friend, paying for goods in crypto, transferring BTC to cold storage, or funding your exchange account for trading — all of this requires understanding a few simple rules.
In this guide, you’ll learn how to safely send cryptocurrency from a wallet or exchange. We’ll cover step-by-step instructions with real screenshots, explain fees, and help you avoid common mistakes that could cost you money.
What You Need to Know Before Your First Transfer
Networks Must Match
A single cryptocurrency can exist across different blockchains. For example, USDT works on Ethereum (ERC-20), BNB Smart Chain (BEP-20), Tron (TRC-20), and other networks.
⚠️ Important: The sender and recipient must use the same network. Sent USDT via Ethereum, but the recipient is waiting on Tron? The funds will be lost forever. This is the most common and costly mistake beginners make.
Fees: Where They Come From and How to Prepare
Every blockchain transfer involves a fee. On exchanges, it’s a fixed amount (for example, 1 USDT on Tron network or 10-15 USDT on Ethereum). In wallets, it works differently — you pay gas directly to the network, and for this you need native tokens: ETH for Ethereum, BNB for BNB Smart Chain, MATIC for Polygon.
A typical situation: you have 100 USDT in MetaMask on Ethereum, but not a drop of ETH. You won’t be able to send USDT until you top up your wallet with at least $5-10 worth of ETH to pay the fee.
💡 Tip: Keep a small reserve of native tokens ($5-20) in your wallet for future transactions.
Address and Memo — Copy, Don’t Type
A wallet address looks like a long combination of characters: 0x742d35Cc6634C0532925a3b844Bc9e7595f0bEb. Always copy it — one mistake when typing manually means loss of funds.
Some cryptocurrencies (XRP, XLM, EOS) require an additional code — Memo or Tag. This is a special identifier for transfers to exchanges. If there’s a Memo field in the form — you must fill it in, otherwise the funds will get stuck.
Quick Checklist Before Sending
✅ Same network for sender and recipient
✅ Sufficient funds for fee (native tokens in wallet)
✅ Address copied correctly
✅ Memo/Tag specified (if required)
💡 Tip: Transferring to a new address for the first time? Send a test amount ($5-10), make sure everything went through successfully, and only then transfer the main amount.
How to Transfer Cryptocurrency from a Wallet
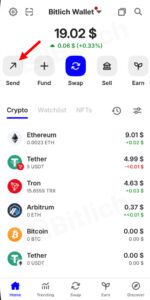
Hot (non-custodial) wallets are apps on your phone or browser where only you control your funds. No company stores your money — everything is under your control. The most popular formats: mobile apps (Trust Wallet, Exodus) and browser extensions (MetaMask, Rabby). Interfaces may differ, but the principle is the same everywhere — select token, enter address, check network, confirm.
From a wallet, you can send cryptocurrency anywhere: to an exchange for trading, to another wallet for security, to friends and partners, to DeFi protocols, or to pay for goods and services. The main thing is to correctly copy the recipient’s address and select the right network.
Below we’ll cover Trust Wallet (mobile) and MetaMask (browser and mobile) — the two most popular hot wallets. Once you master them, you’ll handle any other wallet easily, because the logic is the same everywhere.
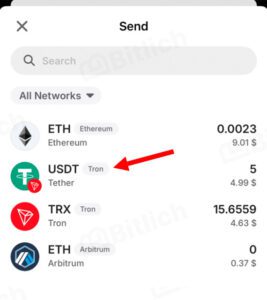
Withdraw from Trust Wallet
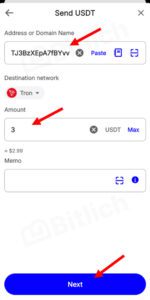
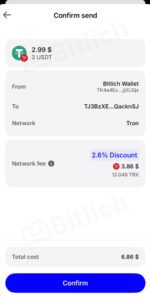
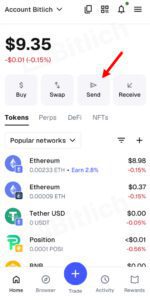
Step 3. Enter Address, Amount, and Check the Fee
Paste the recipient’s address in the field. If Memo is required (for XRP, XLM, and others) — be sure to specify it.
Make sure you have the native token to pay the fee (in this case, TRX). Enter the amount to send and tap «Next».
💡 Tip: Check the first and last 4-6 characters of the address before sending.
Withdraw from MetaMask
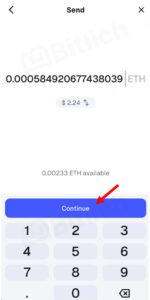
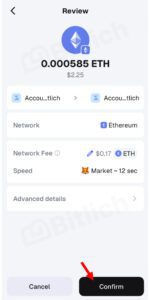
Step 5. Review Data and Confirm
Before sending, carefully check:
- Recipient’s address (first and last 4-6 characters)
- Network
- Fee size
If everything is correct — tap «Confirm». The transaction will go to the blockchain, and the funds will reach the recipient in 1-5 minutes depending on Ethereum network congestion.
How to Transfer Cryptocurrency from an Exchange
Exchanges work differently: they store your cryptocurrency in their wallets, you don’t manage private keys directly. But in return, you get convenience and flexibility.
What exchanges offer:
Unified balance for each token — your BTC, ETH, or USDT is stored as one balance, regardless of blockchain. When withdrawing, you simply choose the network you need: want to send USDT via cheap Tron — go ahead, via Ethereum — also possible. No need to maintain separate balances for each network.
Network choice and low fees — you can withdraw a token via dozens of different blockchains and choose the most profitable in terms of price and speed.
Trading convenience — quick exchange between coins, staking, access to various tools in one place.
Withdrawal features:
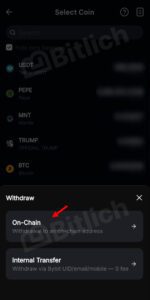
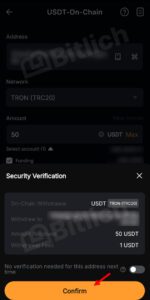
Goes through security verification (2FA confirmation) and takes 5 to 30 minutes. There are two types: on-chain withdrawal to any external address (via blockchain, with fee) or internal transfer to another user of the same exchange (instant and free).
💡 Tip: Don’t keep large amounts on an exchange permanently — for long-term storage, it’s better to withdraw to a personal wallet where only you control the funds.
We’ll break down the process using Binance and Bybit as examples.
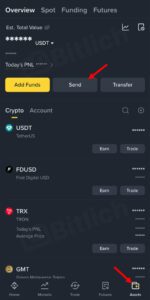
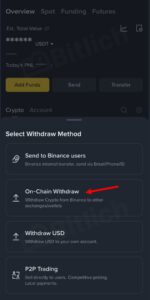
Withdraw from Binance
Step 4. Paste Address, Select Network and Amount, and Tap «Withdraw»
Address: Paste the recipient’s wallet address (use copy-paste).
Network: Select the blockchain. For USDT:
- Ethereum (ERC20) — ~2-5 USDT fee
- BNB Smart Chain (BEP20) — ~0 USDT
- Tron (TRC20) — ~1 USDT
Amount: Specify the quantity. The final amount after fee deduction will appear below.
💡 Tip: Tron and BSC are the cheapest networks for withdrawing stablecoins.
Step 5. Review Data and Confirm via 2FA
Double-check all data:
- Recipient’s address (first and last characters)
- Selected network
- Withdrawal amount and fee
Tap the «Confirm» button. Binance will ask to confirm the operation:
- Enter code from email
- Enter code from SMS (if enabled)
- Enter code from Google Authenticator or another 2FA app
After confirmation, the withdrawal request will go into processing. Funds will arrive at the wallet within 2-30 minutes, depending on the selected network’s congestion.
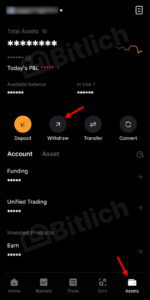
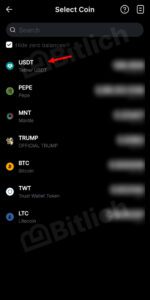
Withdraw from Bybit
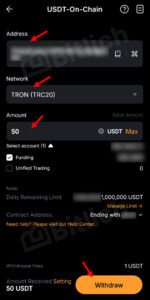
Step 4. Paste Address, Select Network and Amount
Address: Paste the recipient’s wallet address in the «Address» field.
Network: Select the blockchain from the list. For USDT available:
- Ethereum (ERC20)
- BNB Smart Chain (BEP20)
- Arbitrum
- Polygon
- Tron (TRC20)
Amount: Specify the number of tokens. Bybit will automatically calculate the fee and show the final amount.
Tap «Withdraw».
More About Transfer Fees
What Makes Up the Fee
The cryptocurrency transfer fee is payment for processing a transaction on the blockchain. But it’s formed differently depending on where you’re sending from.
Exchange fees — fixed. Binance, Bybit and other platforms set their own amount for each network. You see the exact amount that will be charged in advance. For example, USDT withdrawal via Tron costs ~1 USDT, via BSC — ~$0.8 USDT, via Ethereum — from $1.5 to $5 depending on network congestion.
Wallet fees — dynamic (gas fee). You pay the blockchain directly for computational resources. The amount depends on network congestion at the current moment: the more transactions, the higher the fee. In Ethereum, gas can cost from $2 to $20+, in BSC or Polygon — $0.10-1, in Solana — fractions of a cent.
Important nuance: The fee doesn’t depend on the transfer amount. Sending 10 USDT costs the same as 10,000 USDT — you pay for transaction processing, not the volume of funds.
Fee Comparison in Popular Networks
Network choice directly affects your expenses. Here’s an approximate comparison for cryptocurrency transfers:
| Network | Fee (exchange) | Fee (wallet) | Time | Native token |
|---|---|---|---|---|
| TON | $0.3-1 | $0.05-0.20 | 30 sec-2 min | TON |
| Polygon | $0.5-1 | $0.01-0.10 | 1-2 min | MATIC |
| BNB Smart Chain (BEP-20) | $0.5-1 | $0.10-0.50 | 1-3 min | BNB |
| Solana | $0.5-2 | $0.0002-0.001 | 30 sec-1 min | SOL |
| Tron (TRC-20) | $0.8-1.5 | $3-7 | 1-2 min | TRX |
| Arbitrum | $0.5-2 | $0.10-1 | 1-3 min | ETH |
| Optimism | $0.5-2 | $0.10-1 | 1-3 min | ETH |
| Avalanche | $0.5-2 | $0.10-0.50 | 1-3 min | AVAX |
| Ethereum (ERC-20) | $1.5-5 | $2-20+ | 1-5 min | ETH |
| Bitcoin | $0.5-3 | $0.50-10+ | 10-60 min | BTC |
⚠️ Important: Data in the table is approximate and constantly changes depending on network congestion and exchange policies. Always check current fees on the withdrawal page before sending — there will be the exact amount that will be charged. The difference can be significant: for example, Ethereum fee on Binance can be either $1.7 or $5-10 depending on current network conditions.
💡 Conclusion: For stablecoin transfers, the most profitable networks are TON, Polygon, Solana and BNB Smart Chain. Ethereum and Bitcoin are suitable for large amounts where a $2-10 fee is insignificant. Note that Bitcoin is significantly slower than other networks — confirmation can take from 10 minutes to an hour.
How to Save on Fees
Choose cheap networks. If the recipient supports multiple blockchains — always choose TON, Polygon, Solana or BSC instead of Ethereum. Save 5-20 times on each transaction.
Transfer at the right time. In wallets, fees depend on network congestion. In Ethereum, gas is cheaper on weekends and at night (UTC). If not urgent — wait a few hours and save up to 50%.
Use exchanges for small amounts. If transferring $50-200 and frequently using an exchange — it’s more profitable to keep funds there. Internal transfers between users of the same exchange are free and instant.
Life Hack ⚡: Cheap Transfers on Tron Network via Energy
Tron is a popular network for USDT, but in 2024-2025 fees there rose to $3-7 per transfer. The problem is that transactions need Energy (network energy), and if you don’t have it — the blockchain automatically burns TRX at a high rate.
But there’s a way to pay 3-5 times less.
Instead of burning expensive TRX, you can buy Energy directly cheaply. One working option is transferring TRX to a special address that automatically returns you the needed amount of Energy.
How it works:
Send 1.5 TRX (~$0.50) to address TV9ucVdm7suZdKTE8kyZQfZcBsgJo2hzs3 — get 65,000 Energy. This is enough for one USDT transfer to an activated wallet (where there’s already USDT).
Send 3 TRX (~$1) to the same address — get 131,000 Energy. Enough for transfer to an empty wallet or exchange.
Energy arrives instantly after transaction confirmation. Use it within 24 hours for your transfers — the fee will be deducted from purchased Energy, not from your TRX.
⚠️ Important: Transfer only TRX, no other tokens will work. This method is tested and works, but always start with a minimum amount (1.5 TRX) to verify for yourself.
💡 When it’s profitable: If you make more than 3-5 USDT TRC-20 transfers per month — buying Energy will pay off. For one-time transfers, it’s easier to use the regular method or choose another network (TON, Polygon or Solana will be cheaper).
Common Transfer Mistakes and How to Avoid Them
Even knowing all the rules, users still lose money due to carelessness. Let’s examine the most common mistakes and how to avoid them.
Mistake #1: Rush and Inattention
What happens: You’re making several transfers in a row, entering autopilot mode — opened form, pasted address, clicked “Send”. On the third transfer, you accidentally paste the address from the previous operation that remained in clipboard, and don’t notice. Money goes to the wrong place.
Or you’re rushing to close a deal before the rate changes — quickly fill out the withdrawal form and choose the first network in the list without checking if it’s the right one. Click “Confirm” — only then realize the mistake.
How to avoid:
- Make it a rule: before each transfer, stop for 10 seconds and check everything again
- Even if it’s the tenth transfer of the day — still check address, network and amount
- Say to yourself: “Address correct. Network matches. Amount right”
💡 Tip: Better to lose 2 minutes checking than all money due to one mistake.
Mistake #2: Confusion Between Similar Tokens
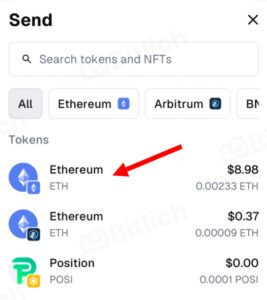
What happens: Need to send USDT but choose USDC. Or want to send ETH but accidentally click on WETH (Wrapped Ethereum). The recipient won’t see the funds or will be confused.
How to avoid:
- Always read the full token name, not just the ticker
- Pay attention to the icon — different tokens have different logos
- If unsure — google the difference between tokens before sending
⚠️ Important: Wrapped tokens (WETH, WBTC) are separate tokens. Sending WETH instead of ETH can confuse the recipient.
Mistake #3: Didn’t Copy the Entire Address
What happens: You select an address on a website or in a message, but the selection slips — only 38 characters out of 42 got copied. Or the address in PDF is split into two lines, and only the first one is copied. You send to a non-existent address — funds are lost.
How to avoid:
- After pasting, check the address length — it should be complete
- Compare the first 6 and last 6 characters with the original
- Use the “Copy address” button where available — it copies correctly
Mistake #4: Didn’t Check Address After Pasting
What happens: There are viruses that replace copied addresses with scammers’ addresses. You copy the right address, but a different one is pasted. Scammers use similar first and last characters, so at a glance everything looks normal.
How to avoid:
- Always check the address after pasting — compare the first 6-8 and last 6-8 characters
- If the address changed even by one character — copy again
- For large amounts, do a test transfer
⚠️ Important: This type of fraud is common. Checking the address after pasting takes 5 seconds that can save your money.
Mistake #5: Manual Address Entry from Screenshot
What happens: The address came as a screenshot or photo. You try to type it manually — confuse capital O with zero, l with one, or just make a mistake. Funds go to the wrong place.
How to avoid:
- Never type an address manually — this rule has no exceptions
- Ask the recipient to send the address as text for copying
- If only screenshot — ask to add the address QR code (most wallets generate it automatically)
⚠️ Important: If using a QR code — after scanning, make sure only the address was inserted into the form. Sometimes QR codes contain additional data (amount, comment) that might go to the wrong field. Always check the scan result before sending.
Mistake #6: Chose Network at Your Discretion
What happens: The recipient sent a wallet address and wrote: “Send me USDT to this address”. You open the withdrawal form on the exchange and see the network list for USDT: Ethereum ($5 fee), Polygon ($0.50), BSC ($0.80), Tron ($1). The recipient didn’t specify the network, and you logically choose the cheapest — Polygon — and send.
But the recipient expects funds on Ethereum because they only have this network set up in MetaMask. The money arrived in Polygon at the same address, but they don’t see it and don’t know what to do. Or you sent via Tron (different address format there) — and funds might be lost.
The problem: Many Ethereum-compatible networks (BSC, Polygon, Arbitrum, Avalanche) use the same address format (0x…). You think: “The address is the same, what’s the difference?”. But there is a difference — these are different blockchains, and the recipient must specifically set up the needed network in their wallet.
How to avoid:
- Received address and coin name? Immediately clarify: “Which network do you accept?”
- Don’t choose the network yourself based on “where it’s cheaper” if not agreed with recipient
- When transferring to a beginner friend, better use standard network (Ethereum for ERC-20 tokens, BSC for BEP-20) — less confusion
💡 Tip: The same 0x… address can exist in a dozen different networks simultaneously. Before sending, always clarify the specific network with the recipient.
The Golden Rule
Blockchain doesn’t forgive mistakes — there’s no “Cancel” button and no support service to return money for an error. Don’t rush, check every detail, do test transfers for large amounts. Better spend 2 minutes and $2 on verification than lose money due to one mistake.
How to Check Transaction Status
Sent cryptocurrency but the money hasn’t arrived yet? Don’t panic — this is normal. Blockchain transactions go through several verification stages, and this takes time. Let’s figure out how to track a transfer and understand what stage your funds are at.
Why Check Status
A transaction can take from 30 seconds to an hour depending on the network and congestion. Status checking helps:
- Ensure money is actually sent and moving through the blockchain
- Understand how much longer to wait for crediting
- Identify problems (insufficient fee, address error, stuck transaction)
- Show the recipient proof of sending if they doubt
💡 Tip: Save the transaction hash (txid) right after sending — it’s the unique identifier of your transfer that can track everything.
Where to Check — Blockchain Explorers
Every blockchain has public explorers (block explorers) — these are websites where all transactions are visible in real time. They work like blockchain search engines: enter transaction hash or wallet address — get full information.
Popular explorers for different networks:
| Network | Explorer |
|---|---|
| Ethereum | etherscan.io |
| BNB Smart Chain | bscscan.com |
| Polygon | polygonscan.com |
| Arbitrum | arbiscan.io |
| Optimism | optimistic.etherscan.io |
| Avalanche | snowtrace.io |
| Tron | tronscan.org |
| Solana | solscan.io or explorer.solana.com |
| Bitcoin | blockchain.com or mempool.space |
| TON | tonscan.org |
All these services are free and don’t require registration.
How to Find Your Transaction
In Wallet or Exchange
After sending cryptocurrency, you’re shown a transaction hash (also called txid or transaction ID). This is a long string of characters like:
0x8f3e2a1b5c7d9f4e6a8b2c1d3f5e7a9b1c3d5e7f9a1b3c5d7e9f1a3b5c7d9e1f
Where to find the hash:
In Trust Wallet: After confirming the send, open “History” → find transaction → tap on it → “View on explorer” button or copy hash icon will appear
In MetaMask: On main screen at bottom tap “Activity” → select needed transaction → window with details and “View on explorer” button will open
On Binance: Assets → History → Crypto withdrawal → find transaction → tap on it → copy TxID
On Bybit: Assets → History → Withdrawals → find transaction → tap “Details” → copy hash
💡 Tip: Most wallets and exchanges have a direct “View on explorer” button — it automatically opens the right website with your transaction.
In Blockchain Explorer
If you have the transaction hash:
- Open the needed explorer (see table above)
- Paste hash in search bar
- Press Enter
A page with detailed transaction information will open:
- From — sender address (yours)
- To — recipient address
- Status — current status (Success, Pending, Failed)
- Value — transfer amount
- Transaction Fee — fee size
- Block — block number the transaction is included in
- Confirmations — number of confirmations
What Transaction Statuses Mean
Success ✅
Transaction is confirmed and recorded on the blockchain. Funds are credited to recipient. Everything is fine.
Pending ⏳
Transaction is sent to the network and waiting to be included in a block. This is a normal state that can last from a few seconds to 10-30 minutes depending on network congestion and fee size.
Failed ❌
Transaction was rejected by the network. Funds returned to your address (except fee — it’s charged anyway). Reasons: insufficient gas, smart contract error, fee too low.
Dropped 🚫
Transaction left the queue (mempool) due to too low fee and wasn’t included in a block. Funds remained with you, fee wasn’t charged. Can resend with higher fee.
⚠️ Important: If transaction shows Success status in explorer but recipient doesn’t see funds — the problem isn’t with blockchain. Most likely they’re looking at wrong network or haven’t added token to wallet.
How Long to Wait for Confirmation
Confirmation time depends on the network. Here are approximate times for popular blockchains:
| Network | Number of confirmations | Crediting time |
|---|---|---|
| TON | 1-2 | 5-10 seconds |
| Solana | 1-2 | 30-60 seconds |
| BNB Smart Chain | 15-20 | 1-2 minutes |
| Polygon | 30-50 | 1-3 minutes |
| Tron | 19-20 | 1-2 minutes |
| Arbitrum | 10-15 | 1-3 minutes |
| Avalanche | 10-15 | 1-2 minutes |
| Ethereum | 12-15 | 3-5 minutes |
| Optimism | 20-30 | 3-5 minutes |
| Bitcoin | 3-6 | 30-60 minutes |
💡 Tip: Exchanges often require more confirmations for security. For example, USDT crediting on Binance may require 12 confirmations on Ethereum (about 3-5 minutes) or 1 confirmation on Tron (1-2 minutes). Exact time depends on network congestion.
What to Do If Transaction Is Stuck
If status is Pending for more than 30 minutes:
- Check the fee — open transaction in explorer and look at Gas Price. If it’s too low (when network is congested), transaction can hang for hours
- Wait — in most cases transaction will still go through, just later
- Speed up transaction — MetaMask and some other wallets have “Speed Up” function that increases fee for acceleration
If status is Failed:
Funds returned to your address (except fee). Check error reason in explorer and resend, fixing the problem:
- Increase gas limit
- Check address correctness
- Make sure balance has enough native tokens for fee
If transaction doesn’t appear in explorer:
Maybe it didn’t leave the wallet at all. Check:
- Wallet balance — were funds deducted
- Transaction history in wallet
- Internet connection at time of sending
⚠️ Important: If you sent funds from exchange and more than an hour passed, but status is still “Processing” — this isn’t a blockchain problem. Exchange is conducting additional security checks. Usually takes up to 30 minutes, but can extend to several hours under high load.
Security Rules for Transfers
Blockchain is protected by cryptography, but most losses occur due to human factor — phishing, viruses and carelessness. Let’s see how to protect your funds during transfers.
Download Wallets Only from Official Sources
Where to download safely:
- Trust Wallet — trustwallet.com or official App Store / Google Play stores
- MetaMask — metamask.io or Chrome Web Store extension store
- Exodus — exodus.com
- Any wallet — search via project’s official website, not through Google ads
⚠️ Important: Scammers create fake websites and apps with similar names. For example, instead of metamask.io there might be metamask-wallet.com, metamask.app or metmask.io (missing one letter). Always check URL character by character.
How to check URL:
- Compare address with official documentation or project’s social media
- Pay attention to domain — should be exact, without extra words
- Don’t click links from ads or suspicious emails
- In app stores check developer name and download count
💡 Tip: Add official exchange and wallet websites to browser bookmarks and access only through them.
Connecting Wallet to Website? Check the Address
When paying for goods or using DeFi services, you need to connect wallet to website. Scammers create copies of popular services and steal funds.
Before connecting:
- Check URL — should be official (e.g.,
uniswap.org, notuniswap-app.com) - Pay attention to connection request in wallet — it shows website address
- If website is suspicious or asks for too many permissions — decline connection
- Google reviews about service before using
⚠️ Important: After connecting wallet, website may request transaction signature. Carefully read what you’re signing — there should be clear information (amount, token, recipient address). If you see strange data — don’t sign.
Enable Two-Factor Authentication on Exchange
Exchanges store many users’ funds, so they’re hackers’ main target. Password protection isn’t enough.
What to enable mandatory:
2FA via app (Google Authenticator or Authy) — this is the main protection. Even if someone knows your password, they can’t log in without code from app.
Email confirmation — with each login and withdrawal you’ll receive code by email.
SMS confirmation — additional protection level (but SMS can be intercepted via SIM-swap, so 2FA app is more important).
💡 Tip: When setting up 2FA, exchange will give backup codes — save them in a secure place (not on phone). If you lose your phone, these codes will help restore access.
Scam: “Send Crypto — Get Double Back”
Classic scam scheme. Scammers write on social media, messengers or create fake websites promising to double your cryptocurrency.
How it looks:
- “Send 0.1 BTC to this address, get 0.2 BTC back”
- “Binance promotion: transfer USDT to address — we’ll return double amount”
- Fake accounts of famous people (Elon Musk, Vitalik Buterin) with similar offers
⚠️ Important: This is 100% scam. Nobody will ever double your money just for a transfer. Such offers ALWAYS lead to loss of funds.
Fake Support Service
Non-custodial wallets (Trust Wallet, MetaMask) don’t have support service that writes first. These wallets are programs on your phone, there’s nothing to break. If “support employee” wrote you — it’s a scammer.
Exchanges have support, but:
- They never write first on Telegram, WhatsApp or social media
- Official support works only through exchange website or official app
- Support will never ask to transfer funds, send seed phrase or private key
Scammer signs:
- Writes first: “We noticed a problem with your account”
- Asks to transfer funds “for unlocking” or “for verification”
- Demands seed phrase or private key
- Pressures urgency: “Act immediately or you’ll lose funds”
- Sends links to fake websites
💡 Tip: If received suspicious email allegedly from exchange — don’t click links from email. Open exchange via bookmark or manually enter address, and check notifications there.
Never Share Seed Phrase
Seed phrase (12 or 24 words) is full access to your wallet. Who knows it — owns all your funds.
Remember:
- Seed phrase can’t be shown or sent to anyone in messages
- Can’t enter it on websites (except wallet recovery on new device)
- Support NEVER asks for it
- Store it in secure place, inaccessible to outsiders
💡 Tip: Some users write seed phrase on paper and store in safe. If holding large amounts — makes sense to leave seed phrase copy with trusted person in case of unforeseen situations. But be extremely selective — this should be close person you fully trust.
⚠️ Important: If someone asks for your seed phrase under any pretext — it’s fraud. No exceptions.
How to Properly Give Address for Receiving Cryptocurrency
When someone wants to send you cryptocurrency, you must provide three things:
- Wallet address (long string of characters)
- Token name (e.g., USDT)
- Network (e.g., Tron TRC-20)
Example of correct message:
Here’s my address:
TWh8Xhm7dN2jKpP9F4VqL3r5TcB8aG1sYx
Token: USDT
Network: Tron (TRC-20)
⚠️ Important: Give ONLY wallet address, token name and network. Never send:
- Seed phrase (12-24 words)
- Private key
- Wallet password
- 2FA codes
If someone asks for seed phrase “to send you money” — it’s a scammer. Only address is needed to receive funds.
Use Cold Wallets for Large Amounts
If storing cryptocurrency worth more than $1,000-5,000 long-term — consider a cold wallet.
What it is: Physical device (e.g., Ledger or Trezor) that stores private keys offline. Even if your computer is infected with viruses, funds are safe.
When to use:
- Long-term storage of large amounts
- Not planning frequent transfers
- Want maximum security
When hot wallet is enough:
- Small amounts for daily operations
- Frequently transfer and use cryptocurrency
- Ready to follow security rules (checking addresses, antivirus, attention)
💡 Tip: You can combine — large amount on cold wallet, and 5-10% for current operations on hot wallet or exchange.
Frequently Asked Questions (FAQ)
Can I cancel a transaction after sending?
If transaction is confirmed (Success status) — no, cancellation is impossible. Blockchain is designed so confirmed transactions are recorded in block forever and can’t be changed or deleted.
If transaction is in Pending status — there’s a small chance. Some wallets (e.g., MetaMask) have “Speed Up” or “Cancel” function that allows sending new transaction with same Nonce (sequence number) and higher fee. If new transaction confirms before old one — first will cancel. But it’s not guaranteed — both transactions might go through.
If exchange withdrawal hasn’t gone to blockchain yet — go to “History” section and click “Cancel” if such button is available. Once transaction hits blockchain — exchange can’t cancel it anymore.
💡 Tip: Cancellation is possible only in very short time window. Much easier to just not rush and check all data before sending.
What to do if sent cryptocurrency to wrong address?
Depends on situation:
If address exists and belongs to someone:
- Funds gone irreversibly — blockchain doesn’t allow returning them
- If transfer was to online store or service — contact their support, they might help
- If it’s exchange or platform — contact their support with proof (screenshots, TxID)
- If random user’s address — chances to get money back practically zero, as you don’t know owner
If address doesn’t exist (mistake in characters):
- In most blockchains transaction simply won’t go through — wallet or exchange won’t let send to non-existent address
- Funds will stay with you
If sent to different network (e.g., ERC-20 tokens via BSC network):
- Funds technically can arrive at same address in different network (if networks are compatible by address format)
- But recipient won’t see them until adding that network to wallet
- Ask recipient to add needed network and check balance there
⚠️ Important: Blockchain has no fund return function. Therefore always check address before sending, and for large amounts — do test transfer.
What to do if forgot to specify Memo/Tag when sending to exchange?
If you sent cryptocurrency (XRP, XLM, EOS, TON and others) to exchange but forgot to specify mandatory Memo or Destination Tag — funds won’t credit to your account automatically. They’ll arrive at exchange’s general wallet, but system won’t understand who to credit them to.
What to do:
- Don’t panic — money isn’t lost, it’s at exchange, just not credited to your account
- Gather transaction data:
- TxID (transaction hash)
- Sender address (your wallet)
- Exact amount
- Correct Memo/Tag that should have been specified
- Contact exchange support via official website (not Telegram!)
- Fill out recovery form — most exchanges have special form for such cases (on Binance and Bybit it’s called “Self-service recovery”)
- Wait for processing — usually takes from few hours to few days
⚠️ Important: Exchange will charge recovery fee — usually 5 times standard withdrawal fee for that coin. If after fee deduction amount is less than minimum withdrawal amount — exchange won’t be able to return funds.
💡 Tip: Always check if Memo/Tag is required when depositing to exchange. If field exists — it’s mandatory to fill.
Why doesn't recipient see funds though transaction is Success?
If blockchain explorer shows Success status, transaction definitely went through and is recorded on blockchain. If recipient doesn’t see funds — problem isn’t with blockchain.
Common reasons:
1. Looking at wrong network
You sent USDT via Polygon, but recipient expects them on Ethereum. Money arrived at same address but in Polygon network. Solution: ask recipient to add Polygon network in MetaMask and check balance there.
2. Token not added to wallet
Recipient sees only main tokens (ETH, BNB), but you sent different token (e.g., USDC or LINK). Solution: recipient needs to manually add token to wallet by contract address.
3. Sent Wrapped token instead of regular
Sent WETH instead of ETH or WBTC instead of BTC. These are different tokens. Solution: recipient needs to add Wrapped token to wallet.
4. Exchange hasn’t credited funds yet
Transaction went through blockchain, but exchange requires certain number of confirmations before crediting (e.g., 12 for Ethereum). Solution: wait few more minutes.
5. Sent less than minimum amount
Many exchanges don’t credit deposits less than minimum amount (e.g., less than 10 USDT). Solution: check minimum amount on exchange and send more to total above minimum.
💡 Tip: Show recipient transaction hash — they can look in explorer themselves that money arrived and figure out why not seeing it in wallet.
Can I transfer cryptocurrency between different blockchains directly?
No, you can’t directly. For example, can’t send Bitcoin directly to Ethereum blockchain or USDT from Tron to Solana in one transaction. These are different networks not connected to each other.
What you can do:
Option 1 — via exchange:
- Send cryptocurrency to exchange in one network
- On exchange choose needed network when withdrawing
- Withdraw to another network
Example: you have USDT in Tron, need to send to recipient on Ethereum. Send USDT TRC-20 to Binance → withdraw from Binance as USDT ERC-20.
Option 2 — via bridges: Special DeFi services that allow moving tokens between networks. But this is for experienced users — beginners easier via exchange.
💡 Tip: Always agree on network with recipient before transfer. If their wallet supports only one network — send exactly to it or first convert via exchange.
Why is fee sometimes bigger than transfer amount?
Yes, this happens, especially on Ethereum network with low amounts.
Why this happens:
Blockchain fee depends not on transfer amount, but on transaction complexity. You pay for network computational resources (gas), not for fund volume. Therefore transferring 5 USDT costs same as 5000 USDT.
Example: gas in Ethereum costs $10. If you’re transferring $8 USDT — fee ($10) indeed bigger than amount ($8).
What to do:
- Choose cheap networks — TON, Solana, Polygon, BSC instead of Ethereum for small amounts
- Don’t transfer too small amounts — if fee is $5, no point transferring $3
- Use exchanges — internal transfers between users of same exchange are free
- For Ethereum wait for low congestion — on weekends and at night gas is cheaper
💡 Tip: Before transferring small amount, check fee. If it’s comparable to transfer amount or bigger — choose different network or postpone transfer.
Will fee be returned if transaction Failed?
No, fee isn’t returned. Even if transaction didn’t go through (Failed status), fee was already paid to miners for attempting to process transaction.
Why:
Miners spend computational resources processing your transaction regardless of result. They get paid for work even if transaction ultimately rejected by network.
What about main amount:
If transaction Failed — main amount (that you tried to send) returns to your address. You’ll only lose fee.
Why transaction can fail:
- Insufficient gas limit
- Smart contract error
- Attempt to send more than balance has
- Technical network problems
💡 Tip: If transaction failed — don’t resend it until figuring out reason. Each attempt will charge fee again.
What's the minimum amount for transfer?
Blockchain has no minimum — technically can send even 0.000001 coin. But it’s impractical if fee will be bigger.
Exchanges have minimums:
For account funding, exchanges set minimum deposit amounts. If send less — funds won’t credit (or will hang until you send the rest).
Examples of minimum amounts for popular exchanges:
| Coin | Binance | Bybit |
|---|---|---|
| USDT (TRC-20) | 1 USDT | 10 USDT |
| USDT (ERC-20) | 10 USDT | 15 USDT |
| BTC | 0.0001 BTC | 0.0005 BTC |
| ETH | 0.01 ETH | 0.02 ETH |
| TON | 0.5 TON | 1 TON |
⚠️ Important: Minimum amounts constantly change. Always check current information on deposit page of needed coin on exchange before sending.
💡 Tip: If accidentally sent less than minimum — send more so total is above minimum amount. Exchange will credit total amount after second deposit.
Let’s Wrap Up
Cryptocurrency transfer isn’t harder than bank transfer if you follow basic rules. Main difference: blockchain has no “cancel” button and support service to return money for mistake. Therefore everything depends on attention.
If doing transfer first time or sending large amount — first send test transfer with minimum amount. Yes, it’s two fees instead of one, but it’s cheaper than losing everything due to typo in address or wrongly selected network. For regular transfers just check all data twice before sending.
And remember: better spend extra two minutes checking address, network and Memo than spend week dealing with exchange support or lose funds forever. In cryptocurrency, responsibility for money lies only on you — and this is both their main advantage and main risk.
Happy transferring! 🚀
