Trust Wallet is a free cryptocurrency wallet for storing, transferring, and using cryptocurrencies, NFTs, and DeFi services. It is available on iOS, Android, and as a browser extension (Chrome, Brave, Edge, Opera).
Unlike exchange wallets, Trust Wallet is non-custodial («hot»): the seed phrase and private keys belong only to you, not the service. This means that access to funds is available only to the owner of the device.
The wallet supports thousands of coins and tokens across dozens of blockchains — from Bitcoin and Ethereum to Solana and Polygon. In addition to storage and transfers, it allows you to swap tokens within the app, participate in staking, and work with NFTs.
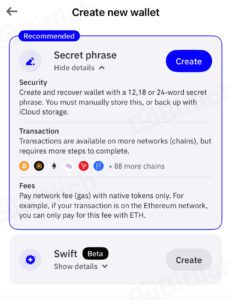
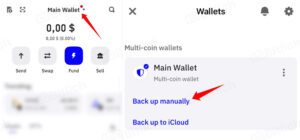
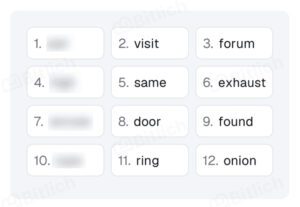
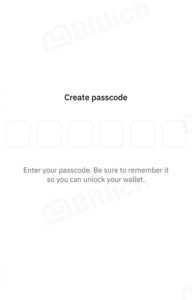
After installation, all you need to do is create a wallet, write down the seed phrase, set up security — and you can start using it.
In this article, you will find a complete breakdown: step-by-step installation, creating and restoring a wallet, an overview of features, as well as the pros and cons of Trust Wallet.
How to Install & Set Up Trust Wallet
Step 1. Download the app
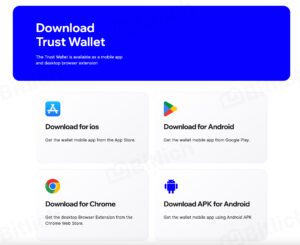
Go to the official Trust Wallet website and install the version for your device: iOS / Android or the browser extension (Chrome/Brave/Edge/Opera).
Restoring a Trust Wallet
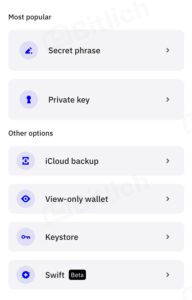
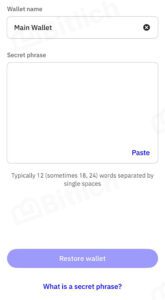
Trust Wallet allows you to restore both a wallet previously created in it and any other compatible wallet if you have a seed phrase, a private key, or a backup in iCloud, Keystone, or Swift.
⚠️ Important: Access to any wallet depends entirely on your seed phrase (12 words) or other backup data.
If they are lost, it is impossible to recover access — neither support nor the developers will be able to help.
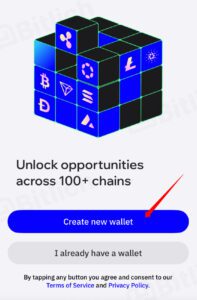
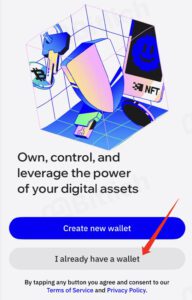
Step 1. Tap «I already have a wallet»
On the start screen of the app or extension, select the option to import an existing wallet. If necessary, you can restore/add a second wallet.
How to Add Funds to Trust Wallet
After creating or restoring your wallet, the next step is to deposit your first coins. Trust Wallet offers several options: buy with a card, transfer from an exchange or another wallet, and local P2P purchase. Let’s go through each one.
1. Buy with a card
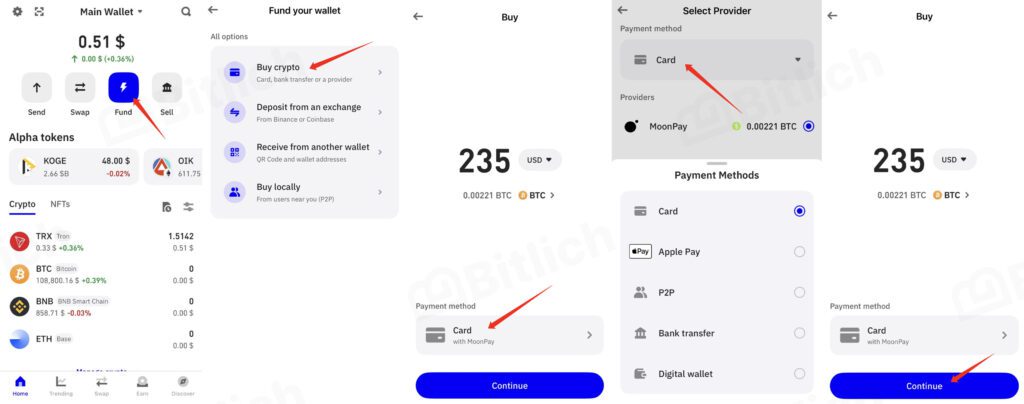
In the app, tap the Buy Crypto button. Select the coin, enter the amount, and pay with your bank card via a third-party provider (e.g., MoonPay or Simplex).
⚠️ However, this method is not available in all countries — if it isn’t supported in your region, you will see the message «Not available». This depends on payment partners and local regulations.
👍 Pros: fast and simple for beginners.
👎 Cons: higher fees than on exchanges, and not available everywhere.
How to:
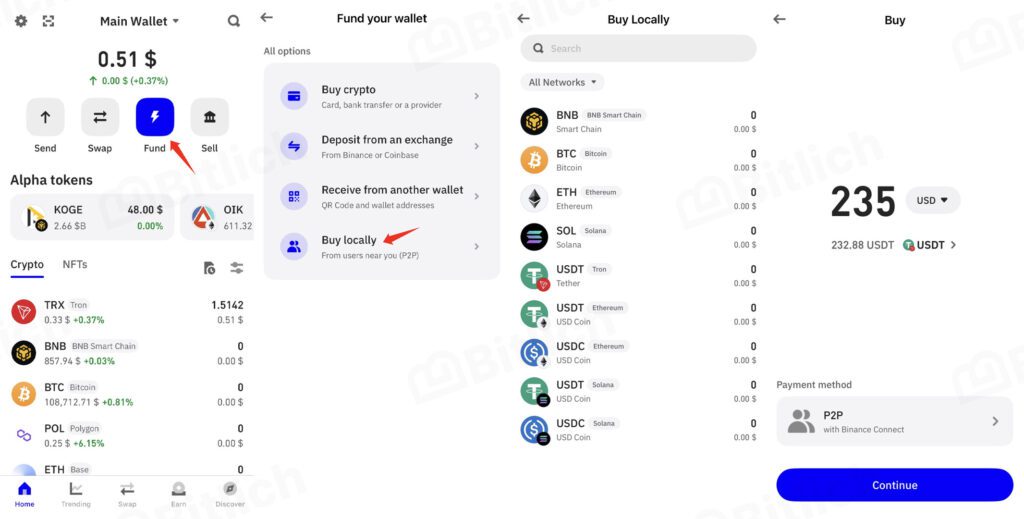
- On the Home screen, tap Fund.
- Select Buy Crypto (Card, Bank Transfer, or Provider).
- Enter the purchase amount and currency.
- Choose a payment method (card, bank transfer) or provider.
- Tap Continue and follow the payment instructions.
2. Transfer from another wallet or exchange
If you already hold cryptocurrency in another wallet (e.g., MetaMask, Exodus, Ledger) or on an exchange, you can simply transfer it to Trust Wallet.
👍 Pros: easy and quick.
👎 Cons: you must carefully check addresses and networks (a mistake can lead to loss of funds).
How to:
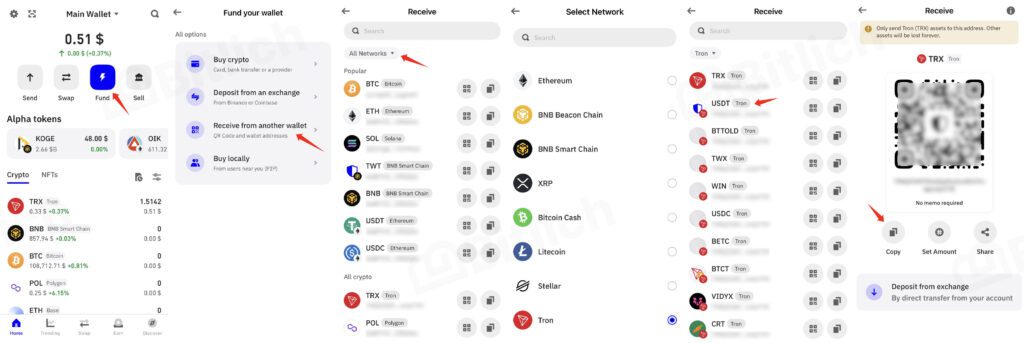
- On the Home screen, tap Fund.
- Tap Receive from another wallet.
- Choose the coin, or tap All networks to select another network.
- Carefully choose the correct network (e.g., Tron TRC-20).
- Select the coin in that network (for example, to deposit USDT TRC-20, select Tron).
- Copy the deposit address next to the coin, or tap the coin to view the full address or QR code.
3. Deposit from Binance or Coinbase
Trust Wallet has two built-in options for direct deposits from exchanges: Binance and Coinbase. This lets you fund your wallet in just a few taps.
👍 Pros: minimal fees, fast speed.
👎 Cons: requires an account on one of these exchanges.
How to:
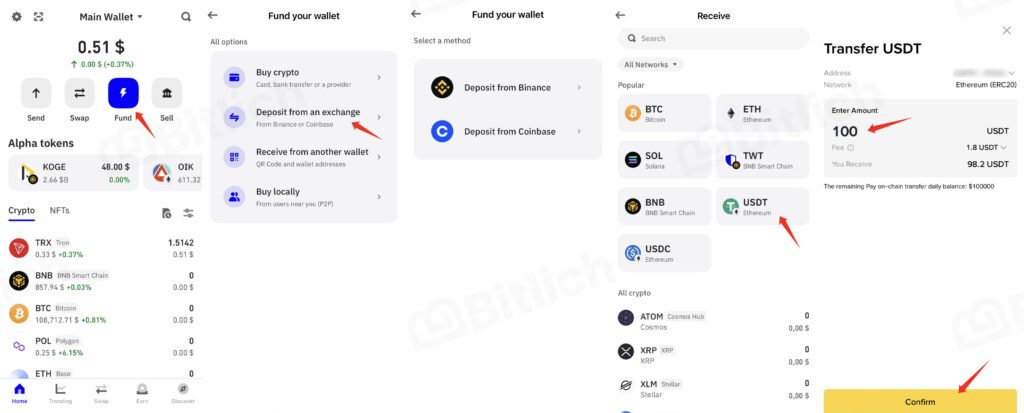
- On Home, tap Fund.
- Tap Deposit from an Exchange (Binance or Coinbase).
- Select the exchange you want to use.
- Choose the coin, or tap All networks to select a specific network (e.g., for USDT TRC-20, choose Tron).
- You’ll be redirected to the exchange app. Enter the transfer amount and confirm. Within a few minutes, the funds will appear in your Trust Wallet.
4. Local purchase (P2P)
Trust Wallet also supports local peer-to-peer (P2P) purchases. This allows you to buy cryptocurrency directly from other users in your region — paying via bank transfer, cash, or other methods.
👍 Pros: sometimes the only option if cards and exchanges are unavailable.
👎 Cons: currently supported only through Binance P2P. There is a high risk of scams, so you must choose only verified sellers.
💡 Tip: If you are a beginner, start with a card purchase (if available). Otherwise, use a transfer from an exchange or another wallet.
How to Withdraw from Trust Wallet
Withdrawing coins from Trust Wallet is just as simple as sending a bank transfer. Select the coin, paste the recipient’s address, enter the amount — and you’re done.
The only nuance: the blockchain requires a network fee to process the transaction. This fee is called «gas» and is always paid in the native coin of the network (for example, ETH on Ethereum or BNB on BNB Chain).
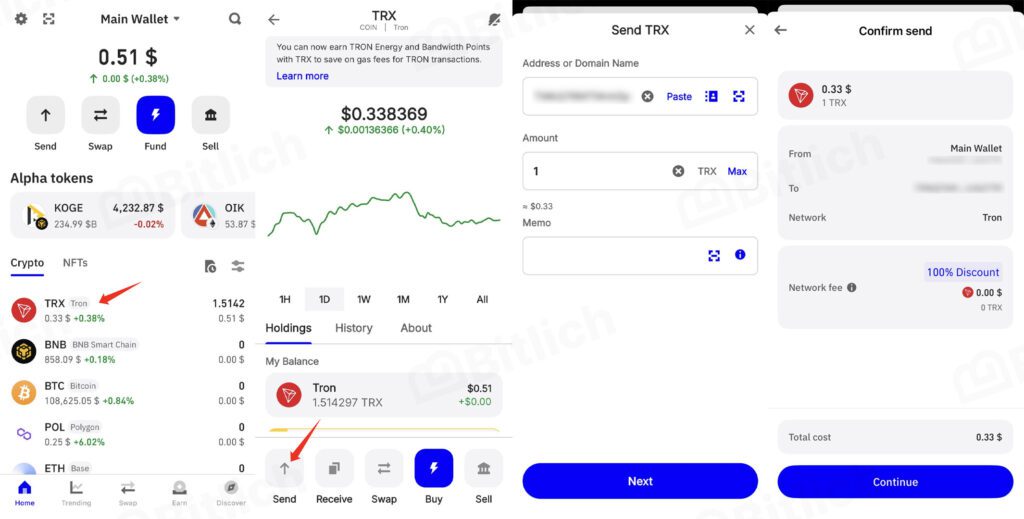
- Open Trust Wallet and tap the coin you want to withdraw (e.g., USDT, ETH, or BTC).
- In the coin’s menu, select Send.
- Paste the address manually or scan the QR code.
⚠️ Make sure the network matches. For example, USDT on ERC-20 cannot be sent to a USDT address on BEP-20. - Enter the amount to send. The network fee will be shown on the screen.
- Double-check the details and confirm. Once the blockchain confirms the transaction, the coins will arrive in the recipient’s wallet.
⚡ Important about fees (Gas fee)
Each network charges a transaction fee in its native coin:
- Ethereum → requires ETH for gas
- BNB Chain → requires BNB
- Polygon → requires MATIC
- Tron → requires TRX
If you only have tokens (for example, USDT on Ethereum) but no ETH for the fee, you won’t be able to send funds.
👉 What to do if you don’t have gas?
- Buy a small amount of the native coin (for example, 0.002–0.005 ETH to transfer USDT on Ethereum).
- Transfer gas from another one of your wallets/exchanges, or ask a friend to send you the minimum amount.
👉 Tip: Always keep a small reserve of gas in your wallet; otherwise, you may get «stuck» with tokens that you cannot send.
Trust Wallet Features
In addition to storage and transfers, Trust Wallet offers a range of extra features that make it a full-fledged hub for working with cryptocurrencies.
Built-in Swap
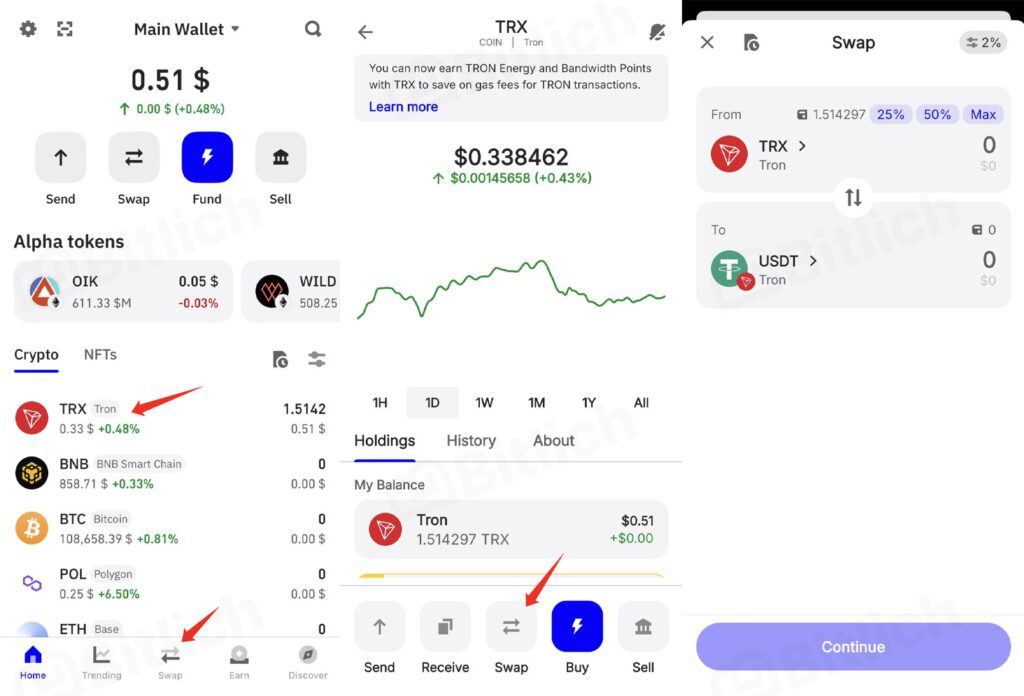
Trust Wallet has a built-in token Swap. It allows you to quickly exchange one cryptocurrency for another right inside the app, without sending funds to an exchange.
How to swap:
- Open the app and select the Swap tab.
- In the From field, choose the coin you want to exchange; in To, select the coin you want to receive.
- Enter the amount.
- Tap Continue to view the rate and fee.
- Confirm the transaction.
Types of swaps in Trust Wallet:
- Same-chain — token swaps within the same network (e.g., ETH → DAI on Ethereum).
- Cross-chain — swaps between different networks without using bridges.
⚡ Good to know:
- Before confirming, you always see the rate and fees.
- You can set the slippage tolerance to protect against sudden price changes.
- Trust Wallet automatically finds the best prices using liquidity from multiple decentralized exchanges.
👉 Swap in Trust Wallet is a convenient way to quickly exchange coins. But for larger amounts, it’s better to use a DEX directly (e.g., Uniswap or PancakeSwap), where liquidity is higher.
DApp Browser
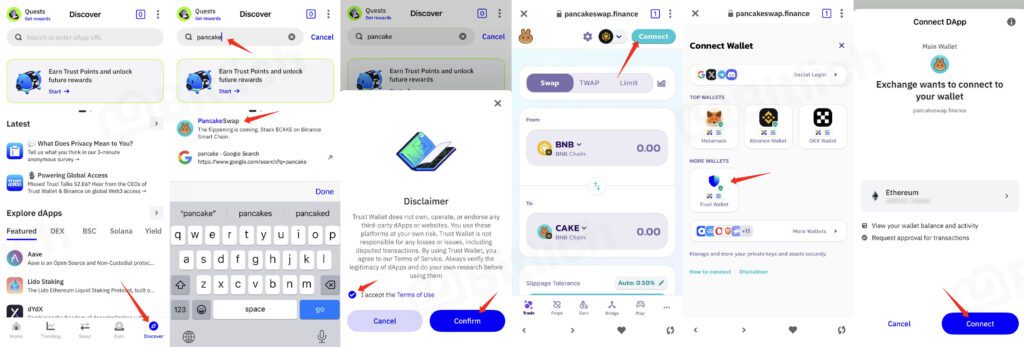
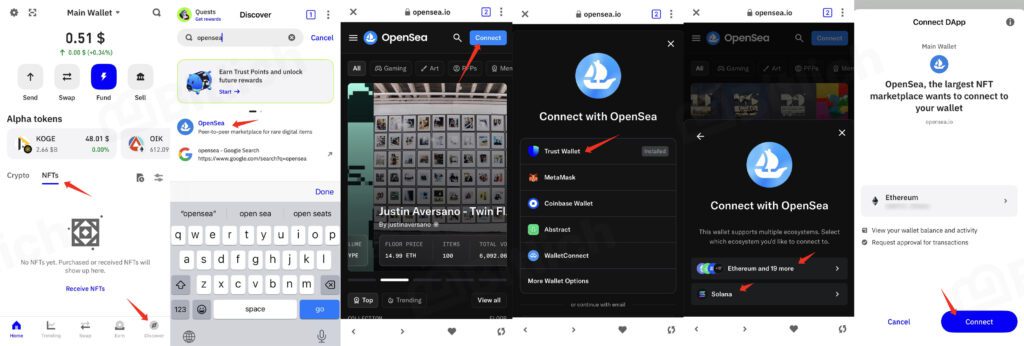
Trust Wallet includes a built-in Web3 browser that lets you connect to decentralized applications (dApps): exchanges, NFT marketplaces, DeFi platforms. Everything works directly inside the wallet, without additional extensions.
How to use the DApp browser:
- Open the app and go to the Discover tab.
- Enter the address of the dApp (e.g., Uniswap, PancakeSwap) or choose one from the popular list.
- Tap Connect and select Trust Wallet from the wallet options.
- Confirm the connection — the wallet is now linked to the application.
- For each transaction, Trust Wallet will show a prompt with details (swap, staking, etc.). Always check the data before approving.
💡 For extra protection, you can use the Security Scanner — a built-in tool that warns you about risky dApps.
Staking
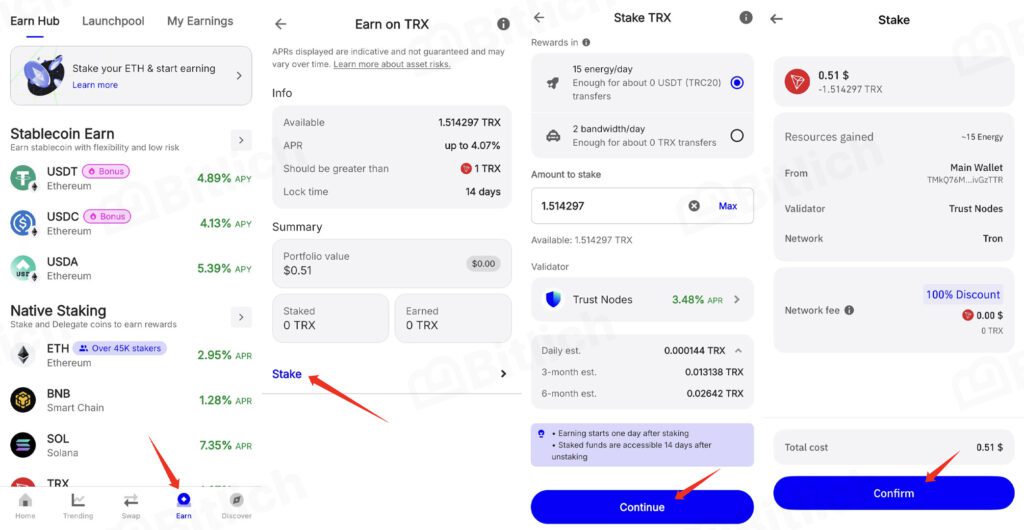
In Trust Wallet, you can not only store cryptocurrency but also earn through staking — delegating your coins to support the network and receiving rewards. Everything is done directly in the app, without complex setup.
How to start staking:
- Go to the «Earn» tab.
- Select the coin you want to stake (for example, TRX, BNB, ETH, SOL, ATOM, NEAR).
- Tap «Stake».
- Choose the reward option, enter the staking amount, and tap «Continue».
- Check the details and tap «Confirm».
- The coins will be locked for the period specified in the terms, and rewards will be credited automatically.
⚡ What you need to know:
Each coin has its own rules:
- TRX — minimum 1 TRX, unbonding ~14 days
- BNB — minimum 1 BNB, unbonding ~7 days
- ETH — minimum 0.025 ETH, unbonding ~4 days
- SOL — minimum 0.01 SOL, unbonding 2–4 days (one epoch)
- NEAR — minimum 0.1 NEAR, unbonding ~2 days
- SEI — minimum 1 SEI, unbonding ~21 days
- Yield (APR) depends on the coin and network, usually from 3% to 15% annually.
- In most cases, rewards are automatically added to the staked balance.
- Unbonding always takes time — staked coins cannot be withdrawn instantly.
👍 Pros of staking in Trust Wallet:
- Everything in one app — no third-party services needed.
- Simple process — literally a few clicks.
- Support for dozens of networks.
⚠️ Important: always consider lock-up periods. If you plan to use your coins frequently, don’t stake the entire amount.
NFTs
Trust Wallet supports NFTs (non-fungible tokens). You can conveniently store, view, and transfer your collections directly in the app — without switching between different services.
What you can do with NFTs in Trust Wallet:
- Store and view tokens in the «NFTs» tab.
- Manage collections from multiple networks at once (Ethereum, BNB Chain, Polygon, etc.).
- Connect to marketplaces (OpenSea, Rarible, etc.) via the built-in dApp browser.
How to use NFTs in Trust Wallet:
- Open the «NFTs» tab — all your tokens will be displayed there.
- To buy or create an NFT, go to a marketplace through the dApp browser (Discover).
- Connect your wallet and confirm the transaction.
- The purchased or created token will automatically appear in the «NFTs» section.
👉 The advantage of Trust Wallet is that you can see all your NFTs in one place, regardless of the blockchain. And the built-in browser allows you to instantly trade or mint new tokens without additional apps.
Custom Tokens
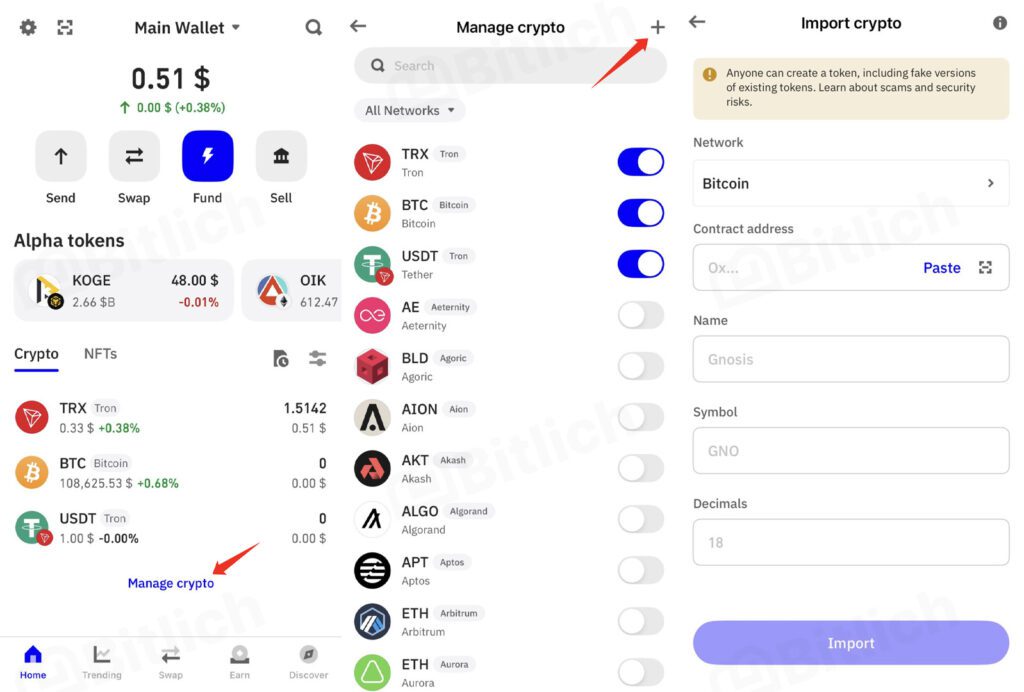
Sometimes the token you need may not appear in the Trust Wallet list. This doesn’t mean the wallet doesn’t support it — it just needs to be added manually. This feature is called custom tokens.
When is this needed:
- The token has just been launched and hasn’t yet been added automatically.
- The token exists on multiple networks (for example, USDT on Ethereum and on BNB Chain).
- You want to see your full portfolio in one wallet.
How to add a custom token:
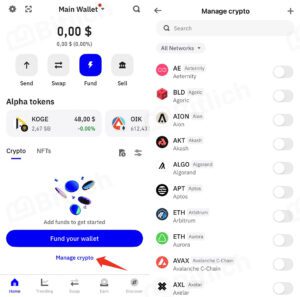
- In the app, tap «Manage crypto» and then tap «+» in the top-right corner.
- Select the network where the token was issued (Ethereum, BNB Chain, Polygon, etc.).
- Paste the token’s smart contract address. Usually, the name, symbol, and decimals are filled in automatically.
- If not, enter the details manually.
- Tap «Import» — the token will appear in your asset list.
⚠️ Important for security:
- Always get the smart contract address only from trusted sources — Etherscan, BscScan, CoinMarketCap, CoinGecko, or the project’s official website.
- Beware of fake tokens: scammers may issue copies with similar names.
- If the wrong data is entered, the token may not work or may not appear at all.
👉 Thanks to custom tokens, Trust Wallet remains a flexible tool: you can manage not only popular coins but also the newest assets, keeping control of your entire portfolio in one app.
Multi-Wallet & Multi-Account
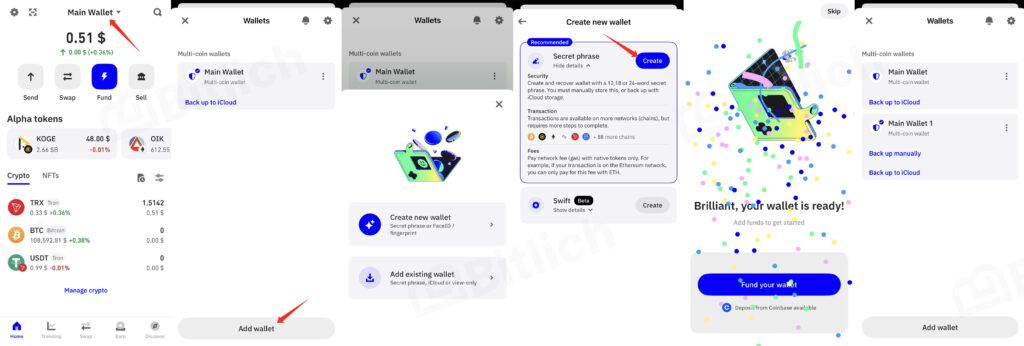
In Trust Wallet, you can manage not just one but multiple wallets. This is convenient if you want to separate assets — for example, keep one wallet for investments, another for DeFi, and a third for P2P.
Multi-Wallet (mobile app)
- In the Trust Wallet app, you can create up to 15 separate wallets.
- Each has its own seed phrase and addresses.
- Switching between them takes just a couple of seconds.
How to add a new wallet:
- On the main screen, tap the name of the current wallet.
- Tap «Add Wallet».
- Choose «Create new wallet» or «Add existing wallet».
- If creating a new one — back up the new seed phrase via manual copy.
Multi-Account (browser extension)
- In the Chrome/Brave/Edge extension, you can create multiple accounts under one seed phrase.
- This means additional addresses are generated automatically — no need to store many seed phrases.
- Suitable for testing, splitting funds, or working with different dApps.
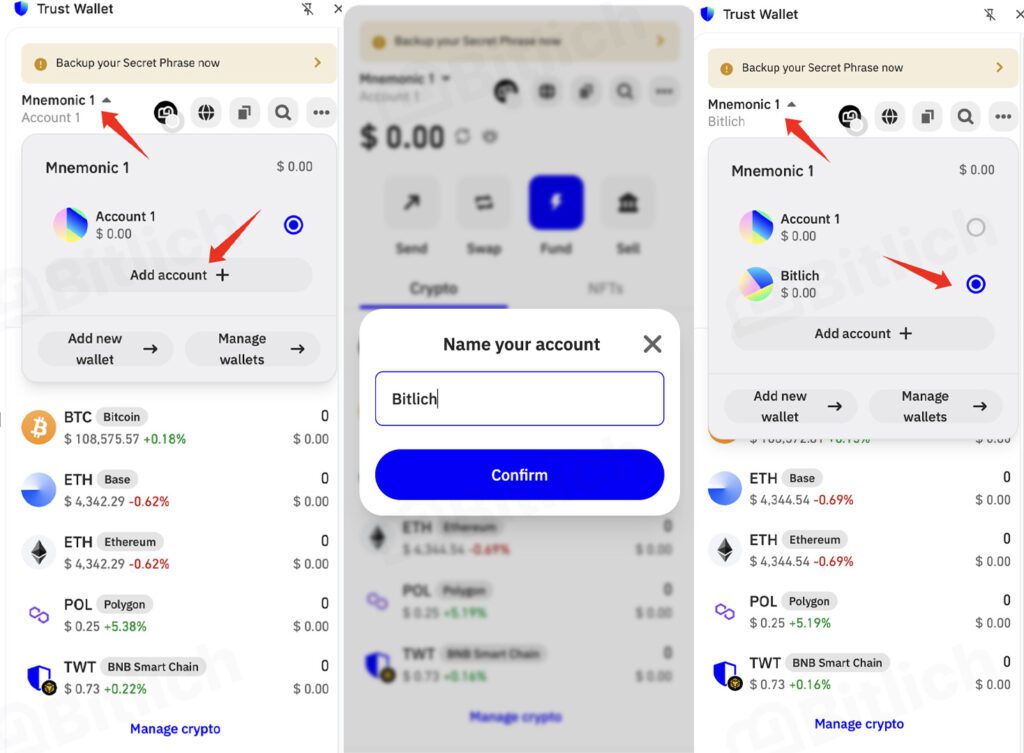
How to add a new account:
- Open the Trust Wallet extension.
- In the top menu, click «Add Account +».
- Enter a name (for example, «Test» or «DeFi»).
- Done — you now have a new address under the same seed phrase.
WalletConnect
WalletConnect is a way to connect Trust Wallet to decentralized applications (dApps) on your computer. It works through an encrypted connection: private keys remain only on your device, and all actions are confirmed in the app.
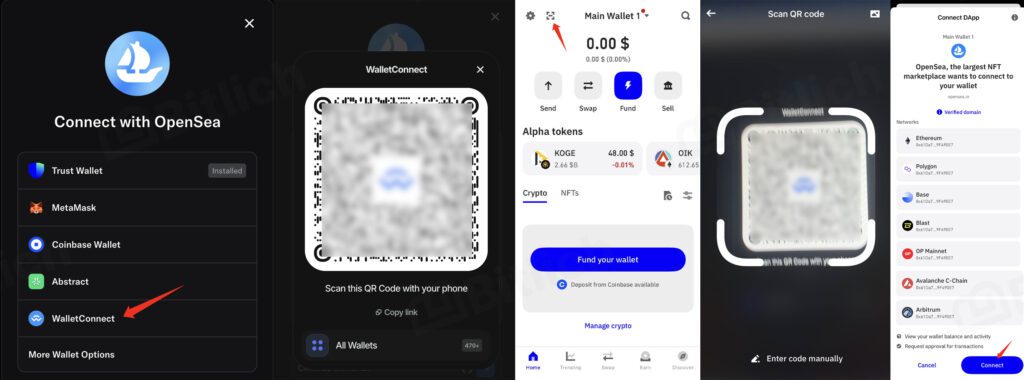
How to connect via WalletConnect:
- On your computer, open the site of the desired dApp (for example, PancakeSwap, Uniswap, Aave).
- Click «Connect Wallet» → select WalletConnect.
- A QR code will appear on the screen.
- In Trust Wallet, open «WalletConnect» and scan the code.
- Confirm the connection — the wallet will be linked to the dApp.
Managing sessions:
- All active connections are shown in the WalletConnect menu in the app.
- To disconnect access — simply tap «Disconnect» next to the dApp.
👉 Advantages of WalletConnect:
- Security — private keys never leave the device.
- Convenience — no extensions or seed phrase entry required.
- Flexibility — works with any dApp: DeFi, exchanges, NFT marketplaces, and more.
Multi-Chain (support for dozens of networks)
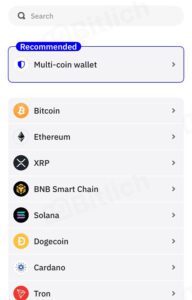
Trust Wallet is a multi-chain wallet. It supports over 100 blockchains, including Bitcoin, Ethereum, BNB Chain, Solana, Polygon, Tron, Cosmos, and many more. This means that in one app you can store and use almost all popular coins and tokens.
Why it’s convenient:
- All networks in one place. No need to install separate wallets for each coin — Trust Wallet unifies them in one app.
- Flexibility. You can choose the network with the conditions you need: Ethereum for DeFi, BNB Chain or Tron for low-cost transfers, Solana for fast transactions.
- Cross-chain swaps. Trust Wallet supports asset swaps between networks (for example, ETH on Ethereum → BNB on BNB Chain) through built-in protocols.
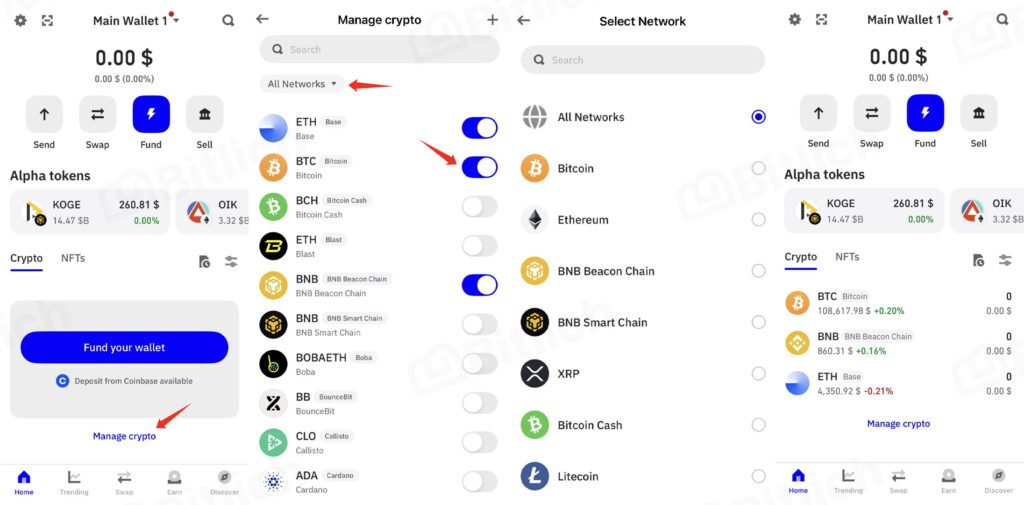
How to use:
- On the home screen, go to «Manage crypto».
- Search for the coins you need in the desired network, or select a network directly.
- Activate them — they will appear on the main page of the app.
👉 Thanks to multi-chain support, Trust Wallet is suitable both for beginners and for those working with DeFi and NFTs across different ecosystems — all in one app.
Binance Pay Integration
For users in regions where it is available, Trust Wallet offers fast integration with Binance Pay. This allows you to deposit and withdraw funds from the exchange directly into the app in just a few clicks.
Pros of Trust Wallet ✅
- Open-source code and audits. The app includes open-source components, which increases community trust.
- Multi-chain support. Over 100 blockchains supported — from Bitcoin and Ethereum to Solana and Cosmos. Effectively replaces dozens of separate wallets.
- Built-in services. Swap, staking, NFTs, dApp browser, custom tokens — all without installing third-party apps.
- WalletConnect. Easily connect the wallet to DeFi and NFT platforms on desktop.
- Beginner-friendly. Simple interface with no unnecessary settings — you can figure it out in 5 minutes.
- Exchange integration. Fast deposits/withdrawals via Binance Pay and Coinbase (where available).
- User control. No KYC, access only through the seed phrase — complete autonomy.
Cons of Trust Wallet ⚠️
- No desktop version. Only mobile devices and the browser extension — a limitation for some users.
- No multisig. You can’t set up multi-signature for added security — a drawback for businesses or shared wallets.
- Dependency on providers. Buying crypto with a card or swapping inside the wallet depends on third-party services (MoonPay, Simplex, THORChain). Sometimes high fees or limited availability by region.
- dApp risks. Any dApp can be connected, but the wallet doesn’t always filter malicious contracts. Beginners can easily lose funds.
- Limited network controls. No advanced fee customization or transaction parameters (unlike MetaMask).
Security When Using Trust Wallet
Trust Wallet is a non-custodial wallet. This means that only you are responsible for keeping access to your funds safe. To avoid losing money, follow these basic rules:
Basic security rules
- Seed phrase = wallet key. Never share it with third parties — not even with «support staff» or «friends in chat».
- Store offline. Write the phrase on paper or engrave it on a metal plate. Screenshots, phone notes, and cloud storage are unsafe.
- Make multiple copies. Keep them in different secure places (for example, at home and in a safe).
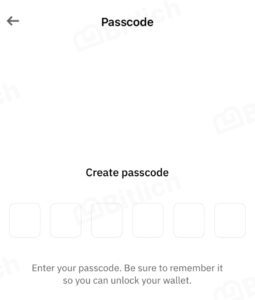
- Enable app protection. Set up a PIN code, Face ID, or Touch ID.
Additional tips
- Verify the site/app: download Trust Wallet only from the official website, the App Store, or Google Play.
- Be careful with dApps: connect your wallet only to trusted services. If in doubt, use the built-in Security Scanner.
- Always check the address and network before sending coins. A mistake will lead to permanent loss of funds.
- Keep a small reserve of native coins for fees (ETH, BNB, MATIC, etc.) so you don’t get stuck with tokens you cannot move.
👉 Remember: without the seed phrase, the wallet cannot be recovered. Security is your responsibility.
FAQ
Can I transfer Trust Wallet to another phone?
Yes. Install the app on the new device and restore the wallet using the seed phrase. The balance will sync automatically.
Is Trust Wallet suitable for long-term storage?
Yes, it is a non-custodial wallet. But for large amounts, it is safer to use hardware wallets (Ledger, Trezor).
Can I restore Trust Wallet without a seed phrase?
No. The seed phrase (12 words or more) is the only way to recover access. If it is lost, the wallet cannot be restored.
What is the difference between Trust Wallet and MetaMask?
MetaMask is mainly designed for Ethereum and compatible networks, while Trust Wallet supports over 100 blockchains and works with NFTs, staking, and dApps in one app.
Can I adjust fees manually?
In some networks (for example, Ethereum) Trust Wallet allows you to set the gas fee. In others (BNB Chain, Solana), the fee is fixed and depends on the network.
What should I do if a token does not appear after transfer?
First, make sure the correct network is selected. If everything is correct, add the token manually via «Manage cryptos» → «+».
Can I use Trust Wallet without verification (KYC)?
Yes. Trust Wallet is a non-custodial wallet, and installation or use does not require registration or KYC.
Conclusion
Trust Wallet is a universal crypto wallet that combines simplicity for beginners with functionality for advanced users. In one app you get: storage and transfers, staking, NFTs, swaps, and access to dApps.
The main thing to remember: security is in your hands. Keep your seed phrase safe, double-check networks and addresses before sending — and the wallet will serve as a reliable tool for working with cryptocurrency.
